https://glutenfreeisrael.com/

Kosher Gluten Free Recipes 

Real recipes approved by my family and my most unforgiving critic me.  I am not a foodie, nor am I a chef I am a guy who likes to eat. I used to joke I don’t drink, smoke, gamble, do drugs or cheat on my wife. Food was my weakness. I eat when I am happy, sad, stressed etc. My wife says that I cook what I want to eat. That is true.  Here are the recipes that I like to eat. 

image of cookbooks with Kosher Gluten Free Recipes

Several years ago I decided I needed a hobby and I started cooking. My family is gluten intolerant. They are not celiac but we have Celiac disease on my wife side of the family. So whenever I cook a meal for the family it has to be gluten free meal.

We keep a Kosher house and are shomer Shabbat. Being shomer Shabbat means that we keep the mitzvot, or commandments, related to the Sabbath, which starts on Friday at twilight and finishes on Saturday after sunset.

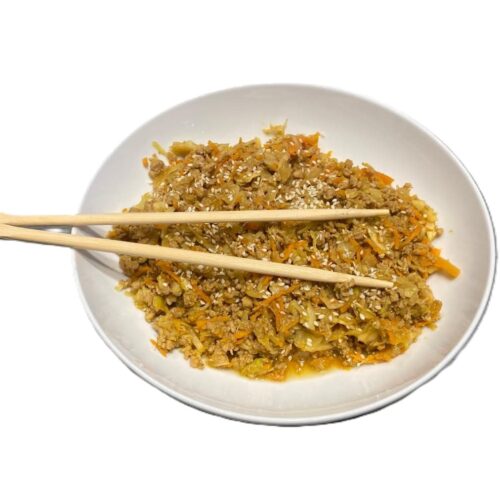
One of the traditions for an observant Jewish home is having a nice meal on Friday night and Saturday lunch. Some have compared the Sabbath meal as to having two American Thanksgiving meals a week.

The meals I make for the Sabbath are always gluten free meals, so we can enjoy them as a family. What is Kosher Keeping Kosher


The word “kosher” has become associated with the connotation of “proper” or “acceptable” in English. However, kosher laws derive from the Bible and are expounded upon in the Talmud and other Jewish tradition codes. Breaking it down to the basics there are three types of Kosher.

Meat
Dairy
Pareve
Foods that are meat are either chicken, beef or lamb, dairy is any food that has dairy in and Pareve are foods which have neither meat or dairy such as fruits, vegetables, eggs and other items with neither milk or meat in them.

As with any religious discussion there are differences as to the level of Kashrut one follows. For this site I am keeping it simple all the recipes and products that I link to have a Kosher certifications that my family abides by. If you have specific questions you can ask my or please talk to your Rabbi as I am not a Rabbinic. If you are looking for a good online resource check out the Chicago Rabbinical Council they have a lot of useful information. 

As I said I am not a chef. I never went to culinary school but my Grandmother was Fay the cook at the Academy the Jewish high school in Chicago for decades. Ask anyone who went there in the 1970’s through the 1980’s and they will remember her. While in high school I would hang out with her before school and during many of my free periods. I guess besides for eating a lot of food some of her skills rubbed off on me.

There is a Yiddish word “shitteryne”. It is not a swear word rather it means cooking by sight and hand. She would joke that she was a shitty cook. Which could not have been further from the truth.

My recipes for gluten free meals follow the “shitteryne” school of cooking. But so the recipes are repeatable I give measurements when applicable. My family and I have approved every gluten free recipe that I post. I will give credit to others for their recipes, several were made by me or I have modified over time using elements by combining several recipes.

Categories of Kosher Gluten Free Recipes

Kosher Gluten Free Recipes – Beef

image of David's Beef Special

David's Gluten Free version of Beef Special

When we lived in Chicagoland we used to go to a restaurant called Tabou Grill. One of our favorite selections on the menu was the beef special. This is my attempt to recreate it.
Just one of my family-friendly Kosher Gluten Free Recipes.
Prep Time 45 minutes
Cook Time 1 hour
Servings 4 people

Equipment

  • 1 cutting board
  • 1 knife
  • frying pan
  • 1 set of measuring spoons

Ingredients
  

  • 1 kilo beef sliced into thin pieces this is equal to 2.2 lbs of cubed beef - we ask the butcher to slice the beef
  • 2 large purple onions or 3 medium-sized onion
  • olive oil to cover the bottom of the frying pan
  • 2 purred of minced garlic I use purred garlic from the store and I make sure the tablespoons are heaping
  • 1 salt or to tasts
  • 1 white ground pepper or to taste
  • 3 cups sliced frozen mushroom or 2 containers of fresh mushroom

Instructions
 

  • pour oil to cover bottom of frying pan
  • heat on low heat
  • add mushrooms, onions, garlic, alt and pepper stirring regularly so vegetables begin to Sautee and do not get burned
  • when onions are about half cooked add the beef
  • continue cooking on low flame and stirring so not to burn

Notes

Great with mashed potatoes or rice.
Image of unstuffed-cabbage

Easy Gluten Free Unstuffed Cabbage one of my Kosher Gluten Free Recipes

Growing up my Grandma made stuffed cabbage, at a certain point my Mom started making unstuffed cabbage based off of my Grandma's recipe. When I got married my wife starting making unstuffed cabbage, using the recipe in the Kosher By Design cookbook written by Susie Fishbein.
I like easy and we do not use sugar in our house so I combined the two recipes to make one recipe that is easy.
Just one of my family-friendly Kosher Gluten Free Recipes.
Prep Time 30 minutes
Cook Time 3 hours
Servings 7 servings

Equipment

  • 2 mixing bowls
  • 1 measuring cup 1
  • 1 set of measuring spoons
  • 1 table spoon
  • 1 9/13 casserole dish

Ingredients
  

  • 1 kilo 2.2 lbs ground beef
  • ¼ cup water
  • ½ cup uncooked rice
  • 1 tbsp salt
  • 1 tsp garlic powder
  • 1 head green cabbage (use bags of pre cut lettuce will save a lot of time)
  • 2 cups tomato sauce
  • cups honey if you want it sweeter add more honey
  • 3 lemons once juiced this is about ½ a cup
  • non-stick cooking spray

Instructions
 

  • put meat and rice into the mixing bowl
  • in a measuring cup mix together, onion soup mix, salt and garlic powder
  • pour into the second bowl
  • pre heat over to 350℉ / 177℃
  • add 32 ounces of tomato sauce to the second bowl
  • add the juice or 3 lemons or about ½ cup of lemon juice to the second bowl
  • add 1½ cups of honey to the second bowl
  • mix all of the wet ingredients
  • pour wet ingredients onto the first bowl
  • add cabbage to the first bowl and mix cabbage, meat, rice, and wet ingredients ingredients together by hand
  • spray 9/13 casserole dish with non-stick spray
  • bake covered for 2 hours at 350℉/177℃
  • then back for another hour at 325℉/163℃
Gluten Free Beef Rub / Beef Seasoning

Gluten Free Beef Rub / Beef Seasoning / All Purpose Rub one of my Kosher Gluten Free Recipes

This is a great rub or seasoning for beef recipes, hamburgers, and chicken, too.
Prep Time 10 minutes

Equipment

  • 1 spice shaker
  • 1 set of measuring spoons

Ingredients
  

  • 2 tbsp garlic powder
  • 2 tbsp onion powder or granulated onions
  • 1 tbsp fine salt
  • 1 tbsp fine black ground pepper

Instructions
 

  • add all the ingredients to a spice shaker
  • shake the shaking to mix the spices
Image of Easy Gluten-Free Overnight Brisket

Easy Gluten Free Overnight Brisket one of my Kosher Gluten Free Recipes

This is the Brisket recipe, it requires minimal prep. The secret is to let it cook slowly overnight.
The longer it cooks the softer the meat gets.
I originally found this recipe on Jamie Gellers website but added the onions to the bottom of the pan and I also use a Gluten Free Beef Rub / Beef Seasoning I created after reading numerous recipes.
Serving size depends on the size of the brisket roughly 1/2 lb or 300 grams per person before meat is cooked there is shrinkage.
Just one of my family-friendly Kosher Gluten Free Recipes.
Prep Time 20 minutes
Cook Time 12 hours

Equipment

  • 1 knife
  • 1 cutting board
  • 1 roasting pan
  • 1 aluminum foil or a top to the roasting pan
  • 1 parchment paper to place between the meat and the aluminum foil
  • 1 meat thermometer

Ingredients
  

  • 1 Brisket
  • 3-6 onions depending on the size of the brisket
  • 3-4 heads garlic depending on the size of the brisket
  • option 1 Gluten Free Beef Rub / Beef Seasoning I posted the recipe at <a https://glutenfreeisrael.com/wprm_print/gluten-free-beef-rub-beef-seasoning/
  • option 2 salt and pepper taster

Instructions
 

  • slice onions
  • peel heads of garlic
  • place onions on the bottom of the roasting pan
  • sprinkle salt and pepper or my Gluten Free Beef Rub / Beef Seasoning on both sides of the brisket
  • place onions and garlic on top of the brisket
  • cook overnight in the oven at 225℉ / 107℃
  • the brisket will be done when the internal temperature of the meat is between 195℉-202℉ or 90.5℃-94.4
  • you can either let the meat rest and serve or warm it up the next day
Gluten Free Pasta Bistro

Gluten Free Pasta Bistro one of my Kosher Gluten Free Recipes

This was a family favorite before we were eating gluten free. Now that we are gluten free it is still a family favorite. I have tweaked it from the original recipe to make it easier and more kid friendly.
Prep Time 10 minutes
Cook Time 1 hour
Servings 4 servings

Equipment

  • 1 knife
  • 1 cutting board
  • 1 set of measuring spoons
  • 1 large not stick pot with a lid Use a non stick it make cleanup super easy and avoids the pasta burning. I have a 8.5 quart pot and can easily double the recipe in the pot.
  • 1 spatula
  • 1 measuring cup
  • 1 nutribullet Personal Blender

Ingredients
  

  • 1 kilo 2.2 pounds of ground beef or turkey
  • 16 ounces gluten free pasta I like Tinkyada Gluten-Free Brown Rice Pasta | Fusilli
  • 2 large onions
  • 700 grams 24 ounces of tomato sauce I like Mutti Tomato Puree it is readily available on the shelves in Israel. Not sure if it is Kosher abroad.
  • 2 cups water
  • 2 teaspoon minced garlic
  • salt to taste
  • 1.5 tbsp Italian seasoning
  • 1.5 tbsp honey
  • olive oil
  • paper towel

Instructions
 

  • peel and quarter onions and place in nutribullet Personal Blender
  • puree the onions
  • pour olive oil on the bottom of the pot
  • add ground meat, pureed onions, minced garlic and salt about (teaspoon)
  • brown meat onions and garlic
  • drain ground meat I use paper towels to soak up the grease
  • pour water, tomato sauce, Italian seasoning, pasta and honey into pot and mix the ingredients
  • cook covered on a low flame mixing every five - seven minutes for about 30-40 minutes until most of the liquid is absorbed.

Notes

The meal tastes best when served fresh,  but it works well rewarmed for Shabbat lunch since there is no liquids in the pot. 
Please support my project by shopping with my affiliate links:
Tinkyada Gluten-Free Brown Rice Pasta | Fusilli
https://amzn.to/4g2gtOZ
Mutti Tomato Puree (Passata), 24.5 oz. -- this product is Kosher in Israel not sure if it Kosher outside of Israel
https://amzn.to/4ioOzy9
nutribullet Personal Blender
https://amzn.to/4f0qb2Z

Kosher Gluten Free Recipes – Poultry

Gluten Free Italian Chicken

Gluten Free Italian Chicken

This recipe is in Autumn Michaelis’s book, Whole Food for your Family 100+ Simple, Budget Friendly Meals.
This has to be one of the easiest chicken dishes that I have every made. Not only is is easy it is delicious.
I doubled the original recipe.
Just one of my family-friendly Kosher Gluten Free Recipes.
Prep Time 19 minutes
Cook Time 25 minutes
Servings 5 people

Equipment

  • 1 measuring cup
  • 1 set of measuring spoons
  • 1 cookie sheet
  • 1 metal rack
  • 1 large zip lock bag or a container with a locking top
  • 1 food scissors

Ingredients
  

  • 1 kilo 2.2 lbs chicken we used dark chicken meat pargit
  • 1⅓ cup almond flour
  • 3 tsp Italian seasoning
  • 3 tsp salt
  • 2 tsp paprika
  • 1 tsp garlic powder
  • 1 tsp onion powder
  • ½ tsp black pepper
  • non stick spray

Instructions
 

  • mix dry ingredients together in the zip lock bag or a container with a locking lid
  • trim fat off of the chicken and cut into 1inch to 2inch strips
  • preheat over to 350℉ or 177 ℃
  • place a couple of pieces of chicken into the container and shake until coated
  • place coated pieces on the cooking rack
  • repeat process
  • spray chicken with non-stick cooking spray
  • bake for 15 minutes flip spray non-stick cooking spray on second side
  • bake for another 10 minutes
  • if chicken is thicker bake for longer
image of turkey smoking on a pellet smoker

Gluten Free Smoked Turkey on a Pellet Smoker

My wife bought me a used smoked from one of the guys from our Synagogue for an anniversary present. It was the best gift ever. Since using it the first time, I have realized that smoking turkey breasts is the best. The are easier to work with and easier to cut as they do not have bones.
Just one of my family friendly Kosher Gluten Free Recipes.
Prep Time 1 day 30 minutes
Cook Time 4 hours

Equipment

  • 1 pellet smoker
  • 1 large pot or food safe bucket
  • 1 large glass bowl
  • 1 measuring cup

Ingredients
  

  • 1 1 spatchcocked turkey or 1 boneless turkey breast
  • 4 cups water boiling water to dissolve the sugar and salt
  • 1 cup brown sugar
  • ½ cup granulated salt
  • 3 oranges
  • 3 lemons
  • 2 cups apple juice or white wine
  • 1 your favorite BBQ rub

Instructions
 

  • Create the brine by adding the sugar and salt to boiling water. add the sugar and the salt. Stir until the sugar and salt are dissolved. Let sit overnight to chill ( the reason for doing this is so you do not start cooking the turkey and then not cook it enough. This can cause bacteria to grow and lead to food poisoning. This can also be done the same day as the brining as long as the mixture has time to be chilled.
  • Slice the lemons and oranges add to the brine
  • Place the turkey in the brine and make sure it is cold.
  • Add more cold water to the pot to make sure the turkey is submerged
  • Make sure the oranges and lemons are dispersed evenly around the pot
  • Put the turkey into the refrigerator overnight for 12 to 16 hours.
  • Turn on the pellet smoker to 250 Fahrenheit or 122 Celsius
  • Take the turkey out of the refrigerator and place onto a stainless steel roasting pan or cookie sheet
  • Cover generously with the the rub
  • Pour the apple juice or wine onto the bottom of the pan / cookie sheet
  • Place in the smoker checking every hour to make sure there is liquid under the turkey
  • If you have place a thermometer into the turkey so can monitor the internal temperature
  • The turkey will be in the smoker for about three and half - 4 hours or until the turkey reaches an internal temperature of 165 Fahrenheit or 74 Celsius.
  • Let the turkey sit for half an hour or refrigerate and eat at room temperature over the next couple of days. My family prefers to eat the turkey room temperature the next day.
Mexican Chicken

Lazy Man Mexican Chicken a Gluten Free Recipe

My kids know that one of my go to recipes is lazy man chicken. Lazy man chicken comes in many forms. Pour a bottle of X over the chicken and bake it. This recipe is my variation of Lazy Man Mexican Chicken. It is easy to make and takes less than 15 minutes to prepare and my family always enjoys it.
I hope your family enjoys this family-friendly Kosher Gluten Free Recipe as much as mine does.
Prep Time 15 minutes
Cook Time 45 minutes
Servings 6 servings

Equipment

  • 1 casserole pan
  • 1 scissors to trim excess fat off of the chicken
  • 1 spoon to smooth out salsa
  • 1 parchment paper I place the parchment paper between the chicken and the tin foil
  • 1 tin foil

Ingredients
  

  • 1 kilo boneless chicken breast or legs and thighs
  • 15.5 ounce 1 jar of salsa mild, medium. or hot depends on you taste bubs

Instructions
 

  • Arrange chicken in a casserole pan
  • Pour salsa over the chicken evenly
  • Cover tightly
  • Bake at 350 Fahrenheit of 167 Celsius for about 45 minutes without bone or closer to an hour with bones

Notes

Serve with rice and roasted vegetable of your choice I recommend broccoli.
Gluten Free Smoked Pulled Chicken

Gluten Free Smoked Shredded Chicken one of my Kosher Gluten Free Recipes

When we lived in Chicago my family loved the Chicken Nacho dish at Milt's Barbecue for the Perplexed. As a side they offer gluten friendly items on the menu. Recently my wife was in Chicago and she went to her friends house for a meal and was served a version of the recipe.
The recipe that she served was from the website Sugarspunrun.com, but it called for a crockpot. Since we do not have a crockpot, I checked out the Traeger website and found their recipe for shredded chicken. Then I called my cousin, who likes to smoke, and asked for his input. In the end, I combined all the information to make my own recipe that, as the Colonel would say it is finger licking good.
This recipe can be a side dish or a main course. Once the chicken is pulled, serve it on a bed of nacho chips and cover with diced tomatoes, avocado, and drizzle garlic mayo on top.
I hope you enjoy this kosher gluten free recipe as much as my family did.
Prep Time 30 minutes
Cook Time 3 hours
Servings 12 servings

Equipment

  • 1 stainless steel casserole dish with a lid or tin foil pans and aluminum foil to cover them with
  • 1 knife
  • 1 measuring cup
  • 1 set of measuring spoons
  • 1 stainless steel bowl
  • food safe gloves I use them when shredding the chicken
  • 2 serving forks

Ingredients
  

  • 12 chicken breasts
  • My beef rub mix It is listed under the recipes and there is a link to it in the notes
  • Paprika
  • apple juice If you can find an lemon or lime juice I prefer that
  • 3 heaping cups your favorite BBQ sauce I like the original Sweet Baby Rays and it is readily available in the Israel
  • 3 over flowing tbls apple cider vinegar
  • 2 cups water

Instructions
 

  • turn on your pellet smoker to 225 ℉ 108c
  • place a stainless steel bowl in the smoker filled with water with about 2 cups of water in it
  • clean chicken breasts
  • place in casserole dish
  • sprinkle beef rub on the top of the breast and then sprinkle paprika on top of the rub
  • rub seasoning into the chicken breast
  • flip chicken and repeat process
  • pour apple juice into the bottom of the pan so it roughly cover ¼-½ of the chicken breasts
  • place chicken into the smoker and leave it until it reaches the internal temperature of about 145℉ / 63℃ (this takes about 2 hours on my smoker)
  • while the chicken is smoking mix the BBQ sauce with the apple cider vinegar
  • When the chicken reaches 45℉ / 63℃, cover the chicken and then turn up the heat of the smoker to 350℉/ 177℃ until the internal temperature of the chicken reaches of 190 ℉/ 88℃
  • take the chicken off the smoker and let it rest for 25 minutes
  • shred the chicken I use a combination of two forks and my hands to shred the chicken some people use an electric mixer
  • pour in the BBQ & Apple Cider sauce as you shred the chicken
  • You can serve hot or warm it up the next day
gluten free eggroll in a bowl

Gluten Free Eggroll in a Bowl

My wife is always on the lookout for new recipes to try. Last month, she sent me two recipes that she found on Facebook:
https://www.facebook.com/share/r/1CSVJ4XqHn/?mibextid=wwXIfr
https://www.facebook.com/share/r/1FmgaN5T2w/?mibextid=wwXIfr
Both recipes are similar, with the one from Stacey Jobe recommending adding Korean BBQ sauce to the finished meal. We added gluten free teriyaki sauce and gluten free soy sauce. The Homemade Food Junkie added green onions as a garnish, which I do not care for, so I skipped them. I also skipped the Hoisin sauce, since I have never seen a Kosher Gluten Free Hoisin sauce. If you have, please let me know where you found it.
The version of the recipe you will see is my version, made with a kilo of ground dark turkey meat. My first attempt was close, but it needed some tweaking. After adjusting the recipe, I am ready to share it. My family really enjoyed it, so it will join the rotation of regular meals, and it has become one of the family's go-to Kosher Gluten Free Recipes.
Prep Time 15 minutes
Cook Time 40 minutes

Equipment

  • 1 large frying pan
  • 1 spatula
  • 1 nutribullet affiliate link below
  • 1 knife
  • 1 cutting board
  • 1 set of measuring spoons
  • 1 measuring cup

Ingredients
  

  • 1 kilo Ground Turkey Breast
  • 2 medium white (or yellow) onions
  • 4 tbsp Sesame oil
  • 4 tbsp Rice vinegar
  • 5 heaping tsp Wet minced garlic
  • 1 cup Gluten free soy sauce
  • 3 tsp Ground dry ginger
  • 2 bags Cole slaw mix cabbage and carrot -- 450 grams
  • 1 bag Shredded carrots -- 250 grams
  • olive oil
  • Gluten free teriyaki sauce

Instructions
 

  • Chop then puree the onion
  • Drizzle olive oil on the bottom of the pan
  • Add onions and ground turkey to the pan and cook until sautéed cook over a low heat
  • Drain excess fat
  • Add all the wet and dry ingredients not including the vegetable to the turkey
  • Stir for a few minutes
  • Add the vegetables and continue to stir
  • Serve warm with some Gluten free teriyaki sauce on the side
Honey Garlic Schnitzel

Honey Garlic Schnitzel

If you are looking for a new twist on schnitzel, then you need to make this recipe. I wish I could say I created it, but the credit goes to Sarah Lasry. https://sarahmlasry.com/hot-honey-garlic-schnitzel
My wife had found this recipe before I started this website, and I couldn't believe I hadn't shared it with you. The recipe calls for Golden Taste Salads Garlic Dip, but since it is not available in Israel, I substituted it with my Garlic Mayo dressing, which I have also listed on the website.
If you are looking for a recipe dripping with flavor that is baked and not fried, this Honey Garlic Schnitzel is a sweet and savory twist on an Israeli classic.
One bite, and you'll know why this recipe is bound to become a family favorite, and is one of our kosher gluten free recipes.
PS -- I suggest doubling the recipe it is that good!
PSS -- I recommend making the garlic mayo the day before and storing it in the refrigerator.
Servings 4 servings

Equipment

  • 2 mixing bowls
  • 1 cookie sheet
  • 1 wire rack
  • 1 set of measuring spoons
  • 1 measuring cup
  • 1 Kitchen Scissors

Ingredients
  

  • 1 kilo chicken thighs also know as Pargit in Israel
  • 2 cups corn flake crumbs we like the B&D brand
  • 4 tsp wet minced garlic
  • 1 cup honey
  • ¼ cup olive oil
  • 1 tbsp smoked paprika
  • 2 tbsp dried parsley
  • Sriracha powder to taste I used an ⅛ of a teaspoon
  • pinch salt
  • non stick cooking spray

Instructions
 

  • Preheat over to 375℉ / 177℃
  • Cut chicken into small pieces
  • Place chicken in mixing bowl
  • Cover chicken with garlic dressing
  • Dredge chicken in corn flake crumbs
  • Bake for 45 minutes in over (the recipe said 25 minutes but I waited until the internal temperature of the chicken was almost 165℉ / 74℃
  • Mix together the honey hot sauce
  • Take chicken out of the oven and spoon the honey sauce over each piece I recommend being generous
  • Bake for another 5 minutes or until the chicken reaches and internal temperature of 165℉ / 74℃
  • Serve hot or warm it up the next day either way there won't be leftovers.
Gluten Free Pecan Crusted Turkey Cutlets

Gluten Free Pecan Crusted Turkey Cutlets one of my Kosher Gluten Free Recipes

Last week while cleaning out the freezer for Pesach I found a package of turkey cutlets. I thought of the recipe that my wife used to make that was in the Kosher By Design cook book, it was for a Walnut Crusted Turkey.
The original recipe includes a sauce that is good but I like to keep things simple. We use canned cranberry sauce, many stores in Israel that cater to the Anglo community carry this item. Since I did not have enough walnuts I decided to improvise and came up with my version of the recipe. I hope you enjoy this Gluten Free Recipe
Prep Time 30 minutes
Cook Time 45 minutes
Servings 6 servings

Equipment

  • 1 food processor or you can use a knife and a nut chopper
  • 1 container with a locking lid or a zip lock bag
  • 1 set of measuring spoons
  • 1 measuring cup
  • 2 bowls one for the eggs and one for the nut and gluten free flour mix
  • 2 cups for cracking the eggs
  • 1 frying pan
  • 1 spatula
  • 1 paper towels
  • 1 plate

Ingredients
  

  • 1 kilo turkey cutlets
  • 1.5 cups finely chopped raw pecans
  • 1 cup gluten free flour
  • 1 tsp fine granulated salt
  • 1 tsp coarse ground pepper
  • canola oil to cook in

Instructions
 

  • Grind about 2.5 cups of pecans halves in a food processor using the “S” blade to get 1.5 cups of finely ground pecans. Do not over-grind a little bit of texture makes it taste better
  • Pour the chopped nuts into the container with a locking lid or a zip-lock bag
  • Add the gluten free flour
  • Add the salt and pepper
  • Shake the mixture -- this can be done the day before
  • Crack and beat the eggs and place them in one of the bowls
  • Pour the nut and gluten free flour mixture into the other bowl
  • Dip turkey in the beaten egg and then dip then dredge turkey in the nut and gluten free flour mixture
  • Heat oil in a frying pan
  • Pan fry cutlets in the frying pan for about 5-6 minutes per side adding oil as necessary
  • When the turkey cutlets are done, place them on a plate with a paper towel to absorb the extra oil
  • Serve with cranberry sauce
sesame chicken recipe

Gluten Free Easy Sesame Chicken

My wife found this recipe on sarah_lasry on Instagram here is a link to the original
I made it last week and my daughter says that it was delicious and I agree and it is easy too.
The original recipe was for 1.5lbs of ground chicken. I used a kilo or 2.2. lbs or dark meat chicken pargit
Just one of my family friendly Kosher Gluten Free Recipes.
Prep Time 20 minutes
Cook Time 30 minutes
Servings 4.5 people

Equipment

  • large mixing bowl
  • 1 measuring cup
  • 1 set of measuring spoons
  • 1 frying pan
  • 1 spatula
  • tongs

Ingredients
  

Marinade

  • 1 kilo ground chicken
  • 2 tsp minced garlic I use the store-bought variety

    don't be stingy heaping is better

  • .75 tsp black pepper
  • 2 tbsp dried parsley
  • 3 tbsp soy sauce
  • ½ cup cup corn starch

Sesame Sauce

  • 6 tbsp soy sauce
  • 7 honey the original recipe called for sugar and honey my wife does not eat sugar so I subbed the sugar for extra honey
  • ½ cup ketchup
  • 2` tsp minced garlic
  • 4 tbsp sweet chili sauce
  • 3 tbsp rice vinegar

Oil to cook

  • olive oil to cover bottom of pan
  • 3 sesame oil

Instructions
 

  • Mix chicken marinade ingredients together in a large bowl.
  • Heat up your frying pan with the bottom covered in olive oil and sesame oil
  • Add the chicken mixture into the frying pan and make a big pattie
  • Let it cook for about 5 minutes on a low flame
  • Using tongs, flip over the chicken in large portions once you have a nice crispy bottom
  • Cook for another 4-5 minutes
  • Then using your tongs or fork, break the chicken up into bite size chunks
  • Add sesame sauce and mix together to coat the chicken.
  • Let the sauce cook down for a few minutes.( I found that the longer I let it sit the better it tasted
  • Sprinkle the sesame seeds on the chicken

Notes

Serve over rice with a side of broccoli

Rotisserie Chicken

Last week, my wife suggested we have rotisserie chicken for Shabbat dinner. Luckily, our barbecue has a rotisserie attachment. We hadn't had rotisserie chicken in over four years, and with the heat outside, it was going to be our main course.
I looked online and found a bunch of recipes because I didn't remember how we made it last time. I saw lots of recipes that called for fancy rubs. I took a page out of the KISS (keep it simple and stupid) playbook and used seasoning we had in the house.
To the guy in the video who made it look easy, trussing the chickens on the spit, I say you are talented. For the rest of us, I recommend trussing the chickens before putting them on the spit.
Rotisserie chicken is a straightforward, kosher, gluten free recipe if you have a barbecue with a rotisserie attachment.
Hope you enjoy it as much as we did.
Prep Time 4 hours 15 minutes
Cook Time 2 hours
Servings 4 servings

Equipment

  • 1 Barbecue with a rotisserie attachment or a rotisserie oven
  • 1 twine
  • 1 cookie sheet
  • 1 digital thermometer

Ingredients
  

  • 1 whole chicken 4-5 lbs / 1.75 - 2.25 kgs If you're in Israel, please request that they pre-prep the chicken by removing the innards, feathers, and the neck (if you choose).
  • olive oil
  • Seasoning / Rub of your choice I used McCormick Garlic and Herb Black Pepper and Sea Salt

Instructions
 

  • Pour olive oil on the chicken and then rub the olive oil over the chicken and generously sprinkle the seasoning or rub over the chicken.
  • Place the seasoned chicken on a cookie tray and let it dry brine for four hours.
  • Truss the chicken(s)
  • Place the trussed chicken(s) on the spit and make sure the brackets are tight so the chicken does not shift.
  • Cook the chicken on a low flame for one and halt to two hours until it reaches 165℉ / 74℃
Three Ingredient Gluten Free Apricot Chicken

Three Ingredient Gluten Free Apricot Chicken

A few weeks ago, my wife mentioned an apricot chicken recipe she used to make and suggested we bring it back for Shabbat.
Sounded like a great idea — until she couldn’t find it anywhere in her bookmarks.
I said, “No worries — my new best friend ChatGPT won’t let me down.”
Sure enough, a few minutes later we had it:
Apricot preserves, mayonnaise, and minced onion.
Three simple ingredients — and it turned out just as good as we remembered.
We may never know who first created the recipe, but whoever she was — thank you for the inspiration.
And thank you to ChatGPT for finding it.
Prep Time 15 minutes
Cook Time 45 minutes
Servings 4 people

Equipment

  • 1 measuring cup
  • 1 knife or scissors
  • 1 casserole dish
  • 1 parchment paper
  • 1 aluminum foil
  • 1 mixing bowl
  • 1 spoon
  • 1 set of measuring spoons

Ingredients
  

  • 1 kilo or 2.2 lbs of boneless chicken thighs called pargit in Israel or boneless chicken breast
  • 1 cup apricot preserves
  • ½ cup mayonnaise Want to be healthy? Try Avacado mayo!
  • 2 tbsp dried minced onion I suggest making them heaping table spoons

Instructions
 

  • Preheat over to 350°F / 175°C
  • Trim excess fat off of the chicken and place in mixing bowl
  • Put the ingredients in the measuring cup and mix together
  • Pour ingredients over the chicken making to sure to coat the chicken
  • Place in the oven and bake for about 45 minutes or until the internal temperature of the chicken is 165℉ or 74℃
Smoked Chicken

Smoked Chicken one of my Kosher Gluten Free Recipes

A few months ago, a friend asked if it was possible to smoke chicken breasts since he had been to our house, where I served smoked turkey. I said it was, but I had never done it.
After some trial and error, I reached the point where I am comfortable sharing it with everyone.
I have used the same recipe for both chicken breasts as well as pargit (boneless chicken thighs)
I hope you enjoy my version of Smoked Chicken, one of my Kosher Gluten Free Recipes.
Prep Time 10 hours
Cook Time 30 minutes
Servings 4 servings

Equipment

  • 1 pellet smoker
  • 1 stainless steel or aluminum pan
  • 1 food safe scissors

Ingredients
  

Instructions
 

  • Turn on the pellet smoker to 225℉ or 108℃ and let it pre heat
  • While heating, trim excess fat, grizzle, or anything else the butcher did not clean off of the chicken.
  • Place the chicken in the pan
  • Sprinkle both sides of the chicken with the seasoning rub
  • Pour apple juice to cover about a 1/4 of the chicken
  • Place in the smoker until the chicken reaches an internal temperature of 165℉ or 74℃.
    Please note that the smoking process takes about 90 minutes. However, be sure to check the thermometer, as the thickness of the chicken will affect the cooking time. Generally, chicken breasts are thicker and will take a little longer to reach the desired temperature.
Turkey Schnitzel

Glute Free Turkey Schnitzel

A couple of months ago in my newsletter, I featured a brand called Eshbal–Barili. At the time, I had only sampled their granola bites.
Last week, I tried something new: Turkey schnitzel made with Eshbal–Barili Gluten-Free Baked Crumbs.
I’ll be honest — I still haven’t perfected pan-frying — but the schnitzels came out delicious, thanks in large part to the texture and consistency of these crumbs. The crumbs were excellent — they stuck perfectly to the turkey, crisped up nicely, and once seasoned, dinner was a total win (and so were the leftovers!).
If you’re looking for a solid gluten-free option next time you make schnitzel, I highly recommend giving Eshbal–Barili Gluten-Free Baked Crumbs a try.
PS: The label is in Hebrew, so look for the bag that says פירורי מאפה.
Prep Time 10 minutes
Cook Time 30 minutes
Servings 4 servings

Equipment

  • 1 large frying pan
  • 2 bowls
  • 2 glasses for cracking and checking eggs
  • 1 set of measuring spoons
  • fork
  • 1 tongs
  • 1 Thermometer

Ingredients
  

  • 1 kilo turkey breast sliced thinly (2.2 lbs)
  • 1 bag ESHBal Barili gluten free Baking Crumbs or the crumbs of you choice
  • 1 tbsp paprika
  • 1 tsp onion powder
  • 1 tsp granulated garlic
  • ¾ tsp fine salt
  • ¼ tsp fine black pepper
  • Avocado oil or oil of you choice for frying

Instructions
 

  • Mix all the dry ingredients in a bowl
  • Crack eggs beat them and then pour in second bowl
  • Dip turkey in egg and then dredge in gluten free baking crumbs
  • Pour oil on the bottom of pan and let it heat
  • Cook for 3-4 minutes then flip and repat process check with thermometer to check internal temperature is 165℉/ 74℃

Kosher Gluten Free Recipes – Pareve

image of salmon with rice and broccoli

Baked Salmon

Baked salmon is an easy recipe that is a go to in our family. It is easy healthy and quick.
Just one of my family-friendly Kosher Gluten Free Recipes.
Prep Time 15 minutes
Cook Time 23 minutes

Equipment

  • 1 cookie sheet
  • 1 aluminum foil
  • 1 parchment paper
  • paper towels
  • 1 spatula

Ingredients
  

  • 1 salmon fillet (1-2 fillets per person) we ask the fish market to cut the fish into slices that are 2 fingers wide
  • salt grinder
  • black pepper grinder

Instructions
 

  • rinse salmon fillets
  • pat dry
  • place on cookie sheet
  • grind salt and pepper to personal taste
  • cook for 23 minute at 350℉ or 176℃

Notes

Goes great with rice or mashed potatoes and broccoli. 
Sushi bowl

Easy to Make Sushi Bowl

One of our family's favorite recipe for a Shabbat meal is a Sushi Bowl. Like all my recipes, I am all for the simple. I do not make sushi rice; if you want to, there are many recipes available online. However, for those who miss the sweet taste of sushi rice without the fuss, we use Marukan Sweet and Tangy Flavor Rice Vinegar. Sprinkle it on, and you have sushi rice.
Gluten Free Soy Sauce is readily available in Israel or you can try Big Tree Farms teriyaki sauce or Big Tree Farms Coconut Aminos .
I also want to apologize for the image. Since we serve this on Shabbat, (and yesterday on Shavuote) I have never been able to take a picture, so thank you, AI, for helping out creating an image.
Prep Time 30 minutes
Cook Time 1 hour 30 minutes
Servings 6 servings

Equipment

  • 1 cookie tray
  • 1 3 quart pot
  • 1 cutting board
  • 1 carrot peeler
  • 1 knife

Ingredients
  

  • 8 slices Slices of salmon approximately 2 fingers thick
  • 2 cups rice you can use -- white, brown or sushi
  • 1- 2 medium / large sweet potatoes
  • 3-5 medium cucumbers
  • 1-2 avacadoes
  • 2-3 carrots
  • 1-2 packages sea weed
  • salt to taste
  • black pepper to taste

Instructions
 

  • Baked the sweet potatoes for about 1 hour at 425℉ / 220 ℃ test to see if cooked
  • I use a salt and pepper grinder to sprinkle salt and pepper onto the salmon and then bake the salmon for 23 minutes at 350℉ / 177℃
  • I let both chill overnight in the refrigerator
  • Day of serving -- peel and shred carrots, dice cucumbers, sweet potatoes and avocadoes.
  • Take rice out of refrigerator about 1 hour before serving so it is room temperature
  • Place each of the diced vegetables in bowls so everyone can make their own bowl
Gluten Free Corn Flake Crumb Fish

Easy Gluten Free Cornflake Covered Fish one of my Kosher Gluten Free Recipes

This recipe is a quick and easy way for your family to enjoy coated fish. The best part of the this recipe is that it is not fried. I have used the same recipe on cod, tilapia and sea bass. Pick your favorite fish and enjoy.
Just one of my family-friendly Kosher Gluten Free Recipes.
Prep Time 15 minutes
Cook Time 23 minutes
Servings 8 people

Equipment

  • 2 mixing bowls
  • 1 set of measuring spoons
  • 1 cookie sheet and baking rack
  • 1 plastic bag or freezer safe container this is if you make a double recipe of seasoned cornflakes

Ingredients
  

  • 2 tbsp Old bay seasoning
  • ¾ tsp celery salt
  • 300 grams corn flake crumbs this is enough coating for 8 servings if you are only making 1 kilo of fish put of the mixture into a separate container so not to contaminate it by the raw fish.
  • 1 kilo 2.2 lbs of your favorite white fish
  • non stick cooking spray

Instructions
 

  • pour the cornflake crumbs into mixing bowl
  • add the Old Bay seasoning and celery salt into the bowl and mix it together
  • spray the baking rack that is on the cookie sheet
  • crack egg and beat it
  • place the fish in the egg and then place the fish into the bowl with spiced crumb mixture
  • if you want extra coating dip coated fish into the egg a second time and then re-dip into the spiced crumbs
  • once fish is coated place on the baking rack
  • place fish into the oven cook at 350℉/177℃ for 23 minutes depending on the thickness of the fish

Notes

Need a cookie sheet and baking rack is available at Amazon
Gluten Free Latkes

Gluten Free Latkes / Gluten Free Potato Pancakes one of my Kosher Gluten Free Recipes

Latkes also know as potato pancakes are meant to symbolize the miracle of Hanukkah. This recipe is a gluten version of this holiday tradition.
Just one of my family friendly Kosher Gluten Free Recipes.
Prep Time 25 minutes
Cook Time 30 minutes

Equipment

  • 1 food processor
  • 1 cutting board
  • 1 knife
  • 1 set of measuring spoons
  • 1 frying pan spatula
  • 1 fork
  • 1 measuring cup
  • 2 mixing bowls

Ingredients
  

  • 4 medium potatoes about 2lbs or a kilo
  • 1 medium onion
  • 2 large eggs or 3 medium eggs
  • 1/2 cup gluten free flour
  • ¼ tsp heaping teaspoon of salt
  • ¼ tsp black pepper
  • oil olive or the oil of your choice

Instructions
 

  • Wash potatoes and cut them so they fit into a food processor and then put into a bowl filled with cool water
  • Peel onion and run through the food processor with the E blade to make the onions a puree
  • Crack eggs and add to the mixing bowl with flour, salt and pepper
  • Process the potatoes with the C food processor blade
  • Mix ingredients to together in the mixing bowl
  • Cover bottom of frying pan with oil. The oil is not to deep fry the latkes but rather to cook them in a thin layer of oil the same as if you were making regular pancakes.
  • Add batter to the pan
  • Cook on medium heat ( I flip the pancakes every couple of minutes so they do not burn) and add extra oil as needed. It take about 5-7 minutes per batch.
Vegetable Latke

Gluten Free Vegetable Latkes one of my Kosher Gluten Free Recipes

Latkes, also known as potato pancakes, symbolize the miracle of Hanukkah. This recipe is a gluten-free version of a potato, zucchini, and carrot latke.
Just one of my family-friendly Kosher Gluten-Free Recipes.
Prep Time 25 minutes
Cook Time 30 minutes

Equipment

  • 1 food processor
  • 1 cutting board
  • 1 knife
  • 1 set of measuring spoons
  • 1 frying pan
  • 1 spatula
  • 1 fork
  • 1 measuring cup
  • 1 mixing bowl

Ingredients
  

  • 1 medium medium potato
  • 1 medium onion
  • 4 medium zucchini
  • 3 carrots
  • 2 large eggs or 3 medium eggs
  • 1 heaping  cup gluten free flour
  • ¼ tsp heaping teaspoon of salt
  • ¼ tsp black pepper
  • oil olive or the oil of your choiceInstructions

Instructions
 

  • Peel onion and run through the food processor with the E blade to make the onions a puree
  • Wash and peel carrots and run through food processor with the C blade
  • Wash zucchini and run through food processor with the C blade
  • Wash potato and run through food processor with the C blade
  • Crack eggs and add to the mixing bowl with flour, salt and pepper, and pureed vegatables
  • Mix ingredients to together in the mixing bowl
  • Cover bottom of frying pan with oil. The oil is not to deep fry the latkes but rather to cook them in a thin layer of oil the same as if you were making regular pancakes.
  • Add batter to the pan
  • Cook on medium heat ( I flip the pancakes every couple of minutes so they do not burn) and add extra oil as needed. It take about 5-7 minutes per batch.
Honey Ginger Garlic Green Beans

Gluten Free Honey Ginger Garlic Green Beans

Honey Ginger Garlic Green Beans are among my favorite green bean recipes. While they may not be as healthy as green beans prepared with olive oil, salt, and pepper, they are a fantastic way to enhance any meal. They pair perfectly with main dishes like turkey or brisket.
Honey Ginger Garlic Green Beans are definitely one of my family's favorite Kosher, Gluten Free Recipes.
Prep Time 20 minutes
Cook Time 25 minutes
Servings 4 servings

Equipment

  • 1 cookie tray
  • aluminum foil
  • parchment paper
  • 1 measuring cup
  • 1 set of measuring spoons
  • 1 mixing spoon or wish
  • 1 tongs
  • 1 disposable gloves

Ingredients
  

  • 1 pound trimmed thin green beans I recommend the frozen variety
  • 1 tbsp olive oil
  • 1 tbsp gluten free soy sauce or tamari
  • 2 tbsp honey
  • 1 tsp ginger powder
  • 1 tsp minced garlic
  • 1 tsp sesame oil
  • salt and pepper to taste

Instructions
 

  • Defrost green beans
  • Pre-heat the over to 425℉/ 218℃
  • Cover cookie tray with aluminum foil and parchment paper
  • Spread green beans evenly over the tray
  • Mix together the gluten free soy sauce or tamari, honey, ginger powder, minced garlic, sesame oil in a mixing cup
  • Pour olive oil on green beans sprinkle salt and pepper to taste
  • Put on glove and mix the olive oil, salt and pepper with green beans
  • Place tray with green beans in the oven for 10 minutes
  • Remove the tray from the oven and evenly pour the honey, ginger and garlic mix on the green beans and use the tongs to make sure that the green beans are evenly coated
  • Place the tray with green beans in the oven for 10 minutes - 12 minutes depending on the thickness of the green beans
  • You can serve the dish immediately or you can reheat them the next day they warm up great on a plattah
Spaghetti Squash

Spaghetti Squash in Tomato Sauce

Did you know that, spaghetti squash is currently in season? One of my favorite side dishes is spaghetti squash with tomato sauce. However, since each spaghetti squash varies in size, you’ll need to taste as you go with this recipe. That said, if you're looking for an easy side dish that pairs well with almost anything, pick up a spaghetti squash or two at your local market and enjoy!
Prep Time 40 minutes
Cook Time 1 hour 30 minutes
Servings 8 servings

Equipment

  • 1 knife
  • 1 spoon
  • 1 cutting board
  • 1 foley food fork ( you can use a large fork if you do not have one)
  • 1 cookie sheet
  • 1 large stainless steel bowl
  • 1 casserole dish
  • parchment paper optional

Ingredients
  

  • 2-3 Spaghetti Squashes
  • olive oil
  • salt
  • black pepper
  • tomato sauce the amount depends on the size of the Spaghetti Squash
  • onion flakes
  • onion powder

Instructions
 

  • Wash the spaghetti squash
  • Cut the top and bottom off then cut in half
  • Scoop out the seeds
  • Preheat your over to 400℉ or 205℃
  • Drizzle olive oil and then sprinkle salt and pepper on each half of the spaghetti squash and then rub the oil salt and pepper into the spaghetti squash
  • Place each of the halves face down on the cookie tray so the skin side is up
  • Stab the spaghetti squash 6 or 7 times per each half
  • Cooke for 1 hour
  • Take spaghetti squash out of the oven and let cool for 20-30 minutes so you do not burn your hands.
  • Rake the spaghetti squash with a foley food fork or a large fork to remove the squash from the skin and place in a the mixing bowl
  • Add tomato sauce to the mixing bowl normally about a cup or so per spaghetti squash. The idea is for the squash to be moist but not wet like when you cover pasta with sauce.
  • Season the spaghetti squash either with onion flakes and onion powder (about a tablespoon of onion flakes and a teaspoon of onion powder per spaghetti squash) and some additional salt. All to taste. Or you can simply use a seasoned tomato sauce and not bother with adding extra seasoning.
  • Mix well in the mixing bowl the scoop into casserole dish and bake at 350℉ / 177℃ for 30 minutes.
  • Serve warm. This recipe also heats up well even on a plattah.
Roasted Onion Garlic Mashed Potatoes

Gluten Free Roasted Onion and Garlic Mashed Potatoes one of my Kosher Gluten Free Recipes

My son says that this could be one of my yummiest mistakes ever. I was trying to make American-style potatoes, but when I cooked them, I made delicious mashed potatoes instead. I hope you enjoy them as much as my family does.
Another of my family's kosher gluten-free recipes.
Prep Time 15 minutes
Cook Time 1 hour
Servings 4 servings

Equipment

  • 1 knife
  • 1 cutting board
  • 1 pot with a lid
  • 1 set of measuring spoons
  • 1 potato masher

Ingredients
  

  • 4 large potatoes
  • 2 large onions
  • 2 tsp minced garlic
  • 1 tsp salt
  • olive oil

Instructions
 

  • pour olive oil to cover the bottom of the pot
  • dice the onions and add them to the pot
  • add minced garlic to the pot
  • wash and quarter the potatoes then add them to the pot
  • mix all the ingredients together
  • cook on a low flame covered stirring every 5-10 minutes
  • when potatoes are soft turn off the flame and let sit for 10 minutes covered
  • mash the potatoes
honey sumac carrots in a white bowl

Honey Sumac Roasted Carrots

As many of you know, my wife is always on the lookout for new recipes to try.
About a month ago, she came across a recipe for Honey Sumac Roasted Carrots by Over Time Cook (click link to see original recipe) and insisted we give it a try.
We didn’t have pomegranate arils or fresh parsley on hand (both were optional garnishes), so we skipped them — and let me tell you… it was still incredible.
Now… if you’re not familiar with sumac, here’s the quick version:
It’s a Middle Eastern spice made from dried, ground berries.
Flavor: slightly tangy, lemony, and bright — it adds instant depth to a dish without overpowering it.
This was my first time using it, and I’m officially a fan.
After one bite, we all agreed this recipe was a keeper — so thank you Over Time Cook for sharing it!
Prep Time 15 minutes
Cook Time 1 hour
Servings 4 servings

Equipment

  • 2 cookie sheet
  • parchment paper
  • 1 set of measuring spoons
  • 1 knife
  • 1 cutting board
  • 1 mixing cup
  • 1 set of food safe kitchen gloves

Ingredients
  

  • 10-12 medium medium carrots
  • 2 red onions I used purple
  • ¼ cup olive oil
  • 2 tbsp honey
  • 2 tsp teaspoons kosher salt
  • 1 tbsp sumac
  • 1 tsp dried thyme
  • Optional pomegranate arils and fresh chopped parsley, for garnish

Instructions
 

  • Preheat oven to 400.
  • Put parchment paper on baking sheet
  • Cut carrots into sticks and place on prepared baking sheet.
  • Cut onions into wedges, leaving the root intact to keep it together; place on baking sheet.
  • Mix together the, olive oil, honey, sumac, salt and thyme in the measuring cup
  • Pour mix over the carrots and onion.
  • Then I tossed the carrots and onions by hand to make sure they were evenly covered. I used 2 cookie sheets for even placement.
  • Bake for 50-60 minutes, stirring halfway through, until vegetables are starting to caramelize.
  • If adding the pomegranate seeds and parsley sprinkle on after the dish is cooked.

Kosher Gluten Free Recipes – Dairy

picture of Eggplant Parmesan Gluten Free Recipe

Gluten Free Eggplant Parmesan

Gluten Free Eggplant Parmesan is one of our favorite Dairy Gluten Free Recipes. I adapted this recipe from several that I found online and from meals that I have ordered at restaurants.. My son says that it is better than some that he has had in restaurants.
Just one of my family friendly Kosher Gluten Free Recipes.
Prep Time 1 hour 3 minutes
Cook Time 30 minutes
Servings 6 people

Equipment

  • 1 knife
  • 1 cutting board
  • 1 cookie sheet
  • 1 measuring cup
  • 1 set of measuring spoons

Ingredients
  

  • 3 medium / large eggplants
  • 200 grams mozzarella cheese
  • cups tomato sauce
  • 1 tbsp tablespoon of Italian seasoning
  • 2 tbsp sugar
  • olive oil
  • pinch salt
  • ¼ cup Parmesan cheese

Instructions
 

  • wash eggplants
  • remove eggplant skin
  • cut eggplant into finger-sized slices
  • lay eggplant on cookie sheets
  • salt both sides of the eggplant a let sit for at least 30 minutes
  • pour tomato sauce into a mixing cup and a pinch of salt, sugar, and Italian seasoning.
  • rinse the eggplant slices and place on a towel to dry off moisture
  • heat olive oil in frying pan
  • place eggplant slices onto the olive oil
  • sprinkle with fine salt
  • cook for about 3.5 minutes per side on a low flame
  • oil a 9×13 casserole pan
  • cover the bottom of the pan casserole with tomato sauce
  • place eggplant slices into the pan as close as possible with as little space as possible
    ( to fill the space I cut slices in half or even quarters)
  • cover eggplant slices with mozzarella cheese
  • cover eggplant slices and mozzarella cheese with tomato sauce
  • repeat the process and layer until the pan is filled and then pour the rest of the tomato sauce over the eggplant slices
  • sprinkle Parmesan cheese on the top
  • Cook for 30 minutes at 350F or 176C
Image of Gluten Free Baked Pasta and Tomato Sauce Gluten Recipe in a 9x13 pan

Gluten Free Baked Pasta and Tomato Sauce

I make this recipe for my family, as well as for families of Miluim, Shiva houses, and friends who have had babies.
One of my friends recently sent the following endorsement
“ It was a huge hit with the kids! And that almost impossible”
Please note I have one family who likes this recipe without tomato sauce it works too.
Just one of my family friendly Kosher Gluten Free Recipes.
Prep Time 40 minutes
Cook Time 30 minutes

Equipment

  • 1 9 x13 casserole pan
  • 1 measuring cup
  • 1 set of measuring spoons
  • 1 nutriBullet blender or similar item
  • pot to cook pasta
  • 1 glass

Ingredients
  

  • 1 egg
  • 1000 grams cottage cheese ( 2.2 pounds)
  • 200 grams mozzarella cheese (.44 pounds)
  • 3 cups tomato sauce
  • ¼ cup Parmesan cheese
  • 1 bag gluten free rice pasta I prefer Tinkyada
  • 1 tbsp Italian seasoning I make it a heaping tablespoon
  • 2 tbsp sugar
  • pinch of salt
  • spinach optional If you want to make it a little healthier add spinach to the mix as much you would like

Instructions
 

  • boil water to cook the pasta add salt to taste into the water
  • oil a 9×13 pan
  • pour 2 ½ cups of tomato sauce into a mixing cup and and a pinch of salt, sugar and Italian seasoning.
  • while the water is boiling put cottage cheese into nutriBullet blender and blend until smooth (need to do it in batches)
  • mix blended cottage cheese with mozzarella
  • crack egg and add beaten egg to the cheese
  • you can add spinach to taste at this point if you like
  • cook the pasta so it is al dente about 1-2 minutes less than the package says to cook it for
  • preheat oven to 350 Fahrenheit or 177 Celsius
  • when noodles are done rinse them ( I like using a pasta pot with a strainer insert)
  • pour pasta into the cheese mixture and mix together
  • pour mixture into the 9×13 pan
  • if not everyone likes spinach in the dish at this point I add spinach to half of the mixture once it is in the pan I am using
  • pour remainder of the tomato sauce on the mixture
  • sprinkle Parmesean cheese on the top
  • Cooke for 30 minutes at 350F or 176C
  • let rest for 15 minutes then enjoy

Notes

I like using the following products for this recipe nutriBullet blender  and  Tinkyada pasta.  Both products link to my Amazon Affiliate marketing page that help fund this site. 
Image of Nacho Casserole

Gluten Free Nacho Casserole one of my Kosher Gluten Free Recipes

My daughter says that this is one of her favorite recipes. I feel bad for not making it more often. This is an easy recipe that anyone can make. Please note you may have extra ingredients left over. This recipe is not an exact science. You layer the ingredients in the casserole dish. I recommend adding light layers of cheese in the center of the casserole, so the top layer of cheese is nicely covered.
Another of our family-friendly kosher gluten free recipes that your kids will enjoy.
Prep Time 20 minutes
Cook Time 45 minutes
Servings 6 servings

Equipment

  • 1 spatula
  • 2 tablespoons
  • 1 9"x 9" casserole dish equivalent to 23cm x 23cm

Ingredients
  

  • 2 430 grams cans of light refried beans equivalent to 2 x 16-ounce cans
  • 2 15 ounce jars of salsa we use mild but if your family likes it spicier you can use medium or even hot salsa
  • 1 800 gram bag frozen kernels of corn there will be extra left
  • ½-¾ kilo shredded cheddar cheese If you are in the US you can substitute this for the Mexican blend
  • 1 can non stick cooking spray
  • 1 bag nacho chips

Instructions
 

  • spray casserole dish with non stick cooking spray
  • spoon out salsa to cover the bottom of the casserole dish
  • sprinkle the cheese over the salsa it does not need to be layered too thick
  • spoon out the refried beans and then use a spatula to spread and flatten
  • cover the refried beans with a layer of corn
  • repeat the process you should have 2 layers of each when done
  • cover the top of the casserole with a final layer of cheese
  • bake in the oven for 45 minutes at 350℉ or 177℃, check after 30 minutes to make sure the cheese is not burning if it is lower the heat
  • serve with nacho chips
gluten free pizza

Gluten Free Pizza

This gluten-free pan pizza was inspired by the pan pizza recipe from Allrecipes on YouTube. I followed their technique — including the smart cheese-first layering tip — and adapted it using gluten-free flour to see how it would perform. You can view the original recipe on YouTube here:
Prep Time 1 day 25 minutes
Cook Time 20 minutes

Equipment

  • 1 large stainless steel bowl
  • 1 set of measuring spoons
  • 1 measuring cup
  • 1 parchment paper
  • 1 cookie sheet
  • 1 saran wrap
  • 1 Rolling Pin
  • 1 spoon
  • 1 whisk
  • 1 pizza stone optional

Ingredients
  

  • 2.5 cups gluten free flour
  • 1.25 tsp yeast
  • 1 tsp salt
  • 1 cup luke warm water
  • 1 tbsp olive oil
  • 250 grams mozzarella cheese
  • .25 cup parmesan cheese

Instructions
 

  • mix and whish dry ingredients
  • add warm water and olive oil
  • knead by hand
  • cover with saran wrap let sit in the refrigerator over night
  • remove from refrigerator about an hour before ready to make pizza
  • place parchment paper on cookie sheet
  • roll out dough does not need to look perfect
  • preheat over to 400℉ / 205℃ with pizza stone if you have one
  • light cover dough with mozzarella cheese and sprinkle a little parmesan cheese on too
  • spread pizza sauce (you can make your own or use sauce out of the jar which is what I did)
  • sprinkle both cheese on top of the sauce
  • add additional toppings if you want
  • bake for about 20 - 25 minutes depending on your oven
Gluten Free Pancakes

Gluten Free Pancakes one of my Kosher Gluten Free Recipes

One of my favorite breakfast meals has always been pancakes and scrambled eggs. Several years ago, my daughter was given a cookbook at one of her after-school activities. We changed the flour to gluten-free flour and added sugar and vanilla to make our own variation of the recipe. With this recipe, I can enjoy one of my favorite meals with the family. Don’t forget to have a hot cocoa with the meal; it makes it that much better, whether you are eating it at breakfast, lunch, or dinner.
Prep Time 20 minutes
Cook Time 45 minutes
Servings 3 servings

Equipment

  • 1 frying pan
  • 1 measuring cup
  • 1 set of measuring spoons
  • 1 soup ladle
  • 1 mixing spoon

Ingredients
  

  • 1.5 cups gluten free flour I like using Bob Red's Mill 1 to 1 Baking Flour
  • 1 tsp baking powder
  • 3 tbsp oil I use canola
  • 1 egg
  • 1.25 cups milk
  • 4 tbsp sugar
  • ½ tsp vanilla
  • 2 pinch salt
  • oil for frying

Instructions
 

  • mix dry ingredients
  • add wet ingredients and mix
  • pour oil into the frying pan and heat it (I use a medium-low heat)
  • use the soup ladle to pour batter into the frying pan
  • cook batter until it starts to bubble about 2-3 minutes
  • flip pancakes and cook for another 2-3 minutes

Notes

Here are links to products that we are an Amazon Affiliate partner for. Please click the link to help support the site.
Bob Red's Mill 1 to 1 Baking Flour
Gluten Free Lemon Garlic Butter Cod

Gluten Free Lemon Garlic Butter Cod one of my Kosher Gluten Free Recipes

Last week, my daughter said, "I want fish for dinner." The grocery store had frozen cod, so I figured I could bread it in gluten-free corn flake crumbs or be creative. I went with option 2, and it worked, so I am sharing the recipe with all of you. It is a quick and easy dinner.
Prep Time 10 minutes
Cook Time 15 minutes
Servings 4 servings

Equipment

  • 1 frying pan
  • 1 spatula
  • 1 set of measuring spoons
  • 1 knife
  • 1 cutting board
  • 1 juicer

Ingredients
  

  • 1 kilo cod
  • 2 lemons juiced use large lemons or 3 medium lemons
  • 2 heaping tablespoon of minced garlic
  • 1 tsp salt
  • 1 pad salted butter
  • 2 tbsp parsley
  • olive oil

Instructions
 

  • lightly cover the base of the frying pan in olive oil
  • then add the minced garlic, salt and butter
  • place on low heat for about 1-2 minutes until the butter is melted
  • add code to the mixture
  • cook for about 3 - 4 minutes then flip and cook second side
  • I then repeated the process for about two additional minutes on each side to make sure the fish was cooked through but not overcooked

Kosher Gluten Free Recipes – Appetizers and Side Dishes

image of Cranberry Walnut Green bean Quinoa Salad

Gluten Free Cranberry Walnut Green Bean Quinoa Salad

Cranberry walnut green bean quinoa salad is a great side dish that compliment poultry, beef and fish dishes. Just one of my family friendly Kosher Gluten Free Recipes.
Prep Time 30 minutes
Cook Time 45 minutes
Servings 5 people

Equipment

  • Pot to cook quinoa
  • 1 mixing bow
  • 1 measuring cup
  • 1 set of measuring spoons

Ingredients
  

  • 1 cup cooked quinoa
  • 1 cup dried cranberries
  • 1 cup frozen chopped green beans
  • 1/4 cup walnuts
  • 1/4 cup chopped green onions
  • 1/4 cup balsamic vinegar
  • 1 1/12 tablespoons olive oil
  • 4 teaspoons minced garlic I use the pre mined garlic
  • 1/2 teaspoon salt
  • 1/2 teaspoon pepper

Instructions
 

  • cook quinoa per instructions on package usually 1 cup quinoa to 2 cups of water
  • let quinoa cool I usually make a day before
  • in a mixing bowl put a cup of quinoa into the bowl
  • add all of the ingredients to the bowl and mix the ingredients
  • place mixed salad in the refrigerator for at least 1 hour
Image of Gluten Free Zucchini-Mushroom Kugel 

Gluten Free Zucchini Mushroom Kugel

My wife found this recipe on Kosher.com. I made a few minor changes to accommodate my wife who does not eat sugar and I changed from canned mushrooms to frozen mushrooms. This recipe has become a family favorite.
Another one of my family friendly Kosher Gluten Free Recipes.
Prep Time 45 minutes
Cook Time 1 minute
Servings 4 people

Equipment

  • 1 frying pan
  • 1 cutting board
  • 1 knife
  • 1 mixing bowl
  • 1 mixing spoon
  • 2 glasses I use an extra glass to check the eggs for blood
  • 1 measuring cup
  • 1 set of measuring spoons

Ingredients
  

  • 4 nice size zucchinis I like using 2 dark and 2 light
  • 2-3 cups frozen sliced mushrooms I find more mushrooms only enhance the tasts
  • 1 tsp salt
  • 4 tbsp potato starch
  • 3 tbsp onion soup mix look for an onion soup mix without MSG
  • 3 tbsp honey
  • 3 eggs
  • olive oil enough to cover the bottom of the frying pan

Instructions
 

  • defrost the mushrooms -- I use the defrost mode on my microwave
  • drain the excess water from the mushrooms
  • quartered and slice the zucchinis
  • cover the bottom of the pan with olive oil place the mushrooms and zucchini over the oil
  • sprinkle salt over the vegetables about a teaspoon
  • sauté for vegetables 10-15 minutes depending on the size of your frying pan
    the softer the zucchini is the better
  • preheat the over to 350 Fahrenheit / 177 Celsius
  • drain an excess moisture from the mushrooms and zucchini mixture
  • pour into a mixing bowl
  • add potato starch, onion soup mix, sugar or honey and eggs into a large mixing bowl
  • mix
  • pour mixture into a oiled nine-inch (20-centimeter) round baking dish
  • Bake for one hour
Gluten Free Pumpkin Kugel

Gluten Free Pumpkin Kugel one of my Kosher Gluten Free Recipes

This recipe was adapted from a Squash Kugel that was in the KINS cookbook a Shul in Chicago.
In Israel pumpkin is readily available. Most makolets and fruit markets have slices of pumpkin or דְלַעַת in Hebrew. So I decided why not try and make this gluten-full squash kugel into a gluten free pumpkin treat.
It has become one of our go to Kosher Gluten Free recipes. I hope that you family enjoys is as much our family does.
Prep Time 45 minutes
Cook Time 2 hours
Servings 10 servings

Equipment

  • 1 baking tray
  • 1 knife
  • 1 cutting board
  • 1 mixing bowl
  • 1 measuring cup
  • 1 set of measuring spoons
  • 1 glass to crack the eggs in
  • 1 spatula
  • 1 nutribullet
  • 1 casserole dish we use an 11" circular dish
  • 1 cake tester or tooth pick

Ingredients
  

  • 3 slices of pumpkin with the peel this is about 111 ounce, 7 pounds, 3 grams
  • 3 large eggs
  • ¾ cup honey
  • ¾ cup mayonnaise
  • 1 tsp vanilla I pour a little extra in
  • 4 tbsp gluten free flour these should be heaping
  • cinnamon shaken to taste
  • nutmeg ` shaken to taste
  • pumpkin spice shaken to taste
  • non stick cooking spray

Instructions
 

  • preheat the over to 375℉ 190 ℃
  • remove pumpkin from the peel and cut into cubes
  • place on the baking sheet
  • bake for 90 minutes
  • remove from oven and let cool
  • once able to touch cut any of the over cooked pumpkin off
  • place the pumpkin pieces into the nutribullet and blend until it is a very smooth
  • add blended pumpkin to the bowl then add the add the rest of the ingredients to the bowl not including the spices
  • once the ingredients are mixed sprinkle the spices on top of the mixture
    when sprinkling the spices I like to make sure that the top of the ingredients are covered
  • spray the casserole bowl
  • use the spatula to evenly spread the mixture in the bowl
  • bake for 45 minutes at 350℉ or 177℃
  • check the kugel with a cake tester or a toothpick if it comes out dry remove from oven if not cook as needed monitoring it every fine minutes.

Notes

The nutribullet  is a great kitchen tool that is useful for so much more than smoothies. 
Wild Rice with Mushrooms, Onions and Garlic

Wild Rice with Mushrooms Onions and Garlic

This recipe elevates rice from a simple side dish to something extraordinary. I prefer using Lundberg Gourmet Blends Wild Blend Rice, but feel free to use any brand you like. The key to enhancing the rice's flavor lies in the sautéed mushrooms, onions, and garlic. This side goes great with chicken, turkey, and even fish.
Prep Time 15 minutes
Cook Time 1 hour 29 minutes
Servings 8 servings

Equipment

  • 1 knife
  • 1 cutting board
  • 1 stainless steel bowl
  • 1 4 quart pot
  • 1 measuring cup
  • 1 set of measuring spoons

Ingredients
  

  • 2 medium yellow onions
  • 3 cups mushroom ( I prefer frozen but you can use fresh)
  • 2 cups wild rice
  • 2 tsp minced garlic
  • salt to taste
  • black pepper to taste
  • olive oil to cover bottom on pan

Instructions
 

  • Defrost mushrooms or cut fresh mushrooms
  • Pour oil into the bottom of the pan
  • Dice the onions into small pieces and place in oil
  • Add salt and pepper to taste and stir occasionally (about a teaspoon of salt and ½ teaspoon of black pepper)
  • After about 5-10 minutes on a low to medium flame add mushrooms and the minced garlic
  • Continue cooking until the vegetable mix is sautéed and the onions are translucent
  • Place the vegetables into a mixing bowl, and put them aside
  • Cook rice per instructions
  • When the rice is about 3/4 of the way cooked, add the vegetables to the pot
  • Taste rice and add additional salt and pepper as needed
Balsamic Vinegar Honey Carrots

Balsamic Vinegar Honey Carrots

I found this recipe a few years ago online. I really do not remember the exact location but I have made a bunch of changes to the original. So to the person who put me on the path thank you.
The recipe can easily be doubled to even tripled.
Just one of my family-friendly Kosher Gluten Free Recipes.
Prep Time 30 minutes
Cook Time 50 minutes
Servings 4 people

Equipment

  • 1 mixing bowl
  • 1 cookie sheet
  • 1 tin foil
  • 1 parchment paper
  • 1 measuring cup
  • 1 set of measuring spoons

Ingredients
  

  • 1 bag frozen baby carrots works best to let them defrost
  • 2 tbsp olive oil
  • 2 tbsp balsamic vinegar
  • 2 tbsp honey
  • 1 tsp salt
  • 8 turns from the black pepper grinder you can do more or less to taste

Instructions
 

  • defrost carrots
  • preheat oven to 400℉ or 200℃
  • cover cookie sheet with tin foil and parchment paper make clean up much easier
  • add honey, balsamic vinegar, olive oil into measuring cup and then mix it together
  • put carrots into the mixing bowl
  • pour honey mixture onto the carrots
  • mix carrots and honey mixture
  • evenly spread on cookie sheet
  • flip carrots every 15 minutes or so
  • cook longer for softer carrots and shorter for al dente
Tangy White Cabbage Salad

Gluten Free Tangy White Cabbage Salad one of my Kosher Gluten Free Recipes

If you a looking for an easy side / appetizer this is the one. Goes great with a variety of meals.
If took elements of this recipe from several I saw online. Like all recipes I substituted honey for sugar.
One of my family's go-to Kosher gluten free recipes.
Prep Time 30 minutes
Servings 6 people

Equipment

  • 1 mixing bowl
  • 1 set of measuring spoons
  • 1 measuring cup
  • 1 lemon press

Ingredients
  

  • head of white cabbage save time and use bags of shredded cabbage
  • 2 tsp fine salt
  • 2 tsp olive oil
  • 8 tbsp honey use less so it is not as sweet
  • 4 tbsp vinegar
  • 2 lemons I include some of the pulp after pressing it
  • ½ cup dried cranberries

Instructions
 

  • add cabbage to a mixing bowl
  • add salt and wet ingredients to the measuring cup and mix together
  • pour mixture onto cabbage
  • mix together with your hand
  • refrigerate
  • before serving sprinkle dried cranberries on the cabbage and serve
garlic mayo

Garlic Mayo one of my Kosher Gluten Free Recipes

Prep Time 15 minutes
Cook Time 30 minutes

Equipment

  • 1 measuring cup
  • 1 set of measuring spoons
  • 1 mixing bowl
  • 1 spoon

Ingredients
  

  • ¾ cup mayonnaise
  • tsp minced garlic ( I do heaping teaspoons)
  • 1 juiced lemon or about 2 ½ tablespoons lemon juice
  • ¾ tsp salt
  • ½ tsp ground pepper

Instructions
 

  • mix all ingredients in a mixing bowl and store covered in fridge for 30 minutes to chill before serving
Easy French Fries

Easy Three Ingredient French Fries

One of my favorite side dishes is French fries. Yes, I am a big kid. French fries go great with so many meals, especially barbeque, which we do a lot.
Potatoes themselves are not the problem, but when you deep-fry them, the calories start to add up, not to mention the mess.
Here is an easy method that I use to make French fries almost as good as those from a restaurant deep fryer, and they are made with only three ingredients.
Hope you enjoy them as much as my family does.
Prep Time 5 minutes

Equipment

  • 1 cookie sheet may need 2 depending on how many people you are serving
  • 1 parchment paper
  • 1 food safe glove

Ingredients
  

  • 1 Bag of frozen French fires (you choose the thickness and the brand)
  • 1 olive oil
  • 1 Simply Organic all seasons salt or a flavored salt of your choice a link to the product is below

Instructions
 

  • Place parchment paper on cookie tray
  • Preheat oven per the bags instructions usually 357℉ / 190℃
  • Place frozen fires on tray unless bag instructions say otherwise
  • Drizzle olive oil over the fries
  • Sprinkle all seasons salt on fries
  • Mix on tray
  • Repeat process until all fries are coated with olive oil and all seasons salt
  • Bake in the oven per bag instructions but I find it take at least 35 minutes and you might have to increase the temperature a little at the end to make them crispier.
Gluten Free Fancy Fries

Gluten Free Fancy Fries one of my Kosher Gluten Free Recipes

My wife found a recipe called Messy Fries on a Peas Loves and Carrots Instagram Post. I tried the recipe and decided I liked the name Fancy Fries instead of messy. The original recipe calls for her special sauce. It was good but I am all for easy so I have simplified the recipe. Of course check out the original try them both and let me know what your thoughts. Thanks to Peas Loves and Carrot sending me in the right direction and helping to upgrade our BBQ!
Prep Time 20 minutes
Cook Time 1 hour
Servings 12 people

Equipment

  • 1 mixing bowl
  • 1 set of measuring spoons
  • 1 knife
  • 1 cutting board
  • 1 frying pan
  • 1 spatula
  • 1 cookie sheet
  • 1 nutriBullet blender
  • food safe gloves optional

Ingredients
  

  • 1 kilo ground geef 2.2 lbs
  • 8 tsp minced garlic or 8 cloves
  • 1 tsp salt
  • 1/2 tsp black pepper
  • 2 medium sized yellow onions
  • olive oil
  • 1 kilo French fries

Instructions
 

  • You will need to either buy or make a garlic mayo dressing. I have a garlic mayo recipe posted under Appetizers and Side Dishes
  • You will also need Thousand Island dressing. To give it a kick, you can add some Sriracha to the dressing.
  • peel the onions and puree in them in the nutriBullet blender
  • add onions, beef, salt, pepper, garlic to the mixing bowl and mix them by hand
  • pre heat frying pan with a generous amount of olive oil
  • crumble the hamburger meat into the frying pan
  • once done drain fat and keep to the side
  • bake French fires per bag instructions
  • 10 minutes before the fries are done spread the cooked meat across the fries
  • drizzle garlic mayo and thousand island dressing on fries before serving

Notes

Here is a link to the nutriBullet   Please click the link to help my affiliate partner profile.
Gluten Free Potato Kugel

Gluten Free Potato Kugel one of my Kosher Gluten Free Recipes

Everyone loves a good potato kugel. The best part is that it can be gluten-free. When I decided to learn how to make potato kugel, we asked people for their recipes and input. I took the parts that I liked from various people's recipes, which were all similar, and made my own. I hope you enjoy it as much as we do. Please excuse the crust on the sides of the casserole dish. When the kugel is covered for the last half hour that is what happened.
Another one of our Kosher Gluten Free Recipes
Prep Time 45 minutes
Cook Time 2 hours
Servings 12 servings

Equipment

  • 2 mixing bowls
  • 1 food processor We use a Braun food processor. For the onions, we use a "C" blade, and for the potatoes, we use the "E" blade.
  • 1 measuring cup
  • 1 set of measuring spoons
  • 1 cutting board
  • 1 knife
  • 1 9"x13" casserole dish
  • 1 spatula
  • 1 large fork
  • 1 glass to crack and check egg
  • 1 aluminum foil
  • 1 parchment paper
  • 1 paper towel to spread olive oil across the casserole dish

Ingredients
  

  • 2.7 kilo 6 lbs of potatoes
  • 2 large onions (or 3 medium)
  • 6 eggs
  • tsp salt or one heaping teaspoon
  • ½ tsp black pepper
  • ¾ cup olive oil
  • 1 splash of olive oil to coat the casserole dish

Instructions
 

  • remove skin from onion -- use a fine blade to mince the onions so they can't be recognized
  • pre heat of to 450℉
  • crack the eggs and beat them and pour into a mixing bowl
  • mix onions, eggs and olive oil
  • peel potatoes and place into a mixing bowl filled with cold water
  • splash a bit of olive oil into the casserole dish use a piece of paper towel to coat pan
  • preheat the over to 450℉ / 232 ℃
  • quickly process the potatoes using the kugel blade and after every couple of potatoes put them in the egg and onion mix to keep them from turning brown
  • once all of the potatoes are processed add the salt and pepper to the mixing bowl and mix all of the ingredients
  • pour the mixture into the casserole dish
  • place in the over and check it at the 1 hour mark to see how dark it is
  • Bake covered at 450℉ / 232 ℃ for 90 minute
  • Bake un-covered at 450℉ / 232 ℃ for 30 minute
Israeli purple cabbage salad

Israeli purple cabbage salad one my Pareve Kosher Gluten Free Recipes

There are numerous versions of Israeli purple cabbage salad available. If you search for it online, you'll find a wide variety of options. After exploring several recipes, I decided to create my own unique variation. I hope you enjoy this salad as much as our guests did at our Yom HaAtzmaut barbecue!
I tripled the recipe for 18 people, and we still had leftovers.
Prep Time 15 minutes
Servings 8 servings

Equipment

  • 1 mixing bowl
  • 1 set of measuring spoons
  • 1 measuring cup
  • 1 spoon
  • 1 lemon press
  • 1 set of food safe gloves

Ingredients
  

  • 1 bag bag shredded purple cabbage this is about 1/2 a cabbage
  • 4 tbsp mayonnaise (heaping)
  • 1 tbsp honey (heaping)
  • 1 tbsp lemon juice (heaping)
  • ¾ tbsp white wine vinegar
  • salt to taste
  • pepper to taste

Instructions
 

  • Juice a lemon
  • Add all the ingredients to the bowl
  • Put on the food-safe gloves and mix the ingredients together
  • Chill for at least an hour
Garlic Salad Dressing

Garlic Expressions (TM) Salad Dressing Dupe (My Version) one of my Kosher Gluten Free Recipes

Recently, my wife came back from the United States with what used to be my favorite salad dressing, Garlic Expressions Vinaigrette (TM). Since we live in Israel and that brand is unavailable, I decided to try making a version of my own. The first try needed a little tweaking, but the second attempt was a success. I hope you enjoy this salad dressing as much as I do.
Prep Time 15 minutes

Equipment

  • 1 measuring cup
  • 1 set of measuring spoons
  • 1 mixing spoon
  • 1 bottle

Ingredients
  

  • ½ cup apple cider vinegar
  • ¼ cup olive oil
  • 2 tsp minced garlic
  • 2 tsp Italian seasoning
  • 3 tbsp honey
  • ¼ tsp salt
  • tsp black pepper

Instructions
 

  • pour all the ingredients into the measuring cup
  • mix all the ingredients together
  • refrigerate to chill
  • take out of refrigerator about 30 minutes prior to using it

Gluten Free Quinoa Sweet Potato Eggplant Salad one of my Kosher Gluten Free Recipes

Several months back, I had a gluten-free quinoa sweet potato eggplant salad at Bleeker Bakery. I liked it, so I decided to try making my own version.
Please don't let the cook time or the number of steps scare you away. Sweet potatoes and eggplants take a while to cook.
I hope you and your family like it as much as my family does.
Prep Time 30 minutes
Cook Time 1 hour 30 minutes
Servings 8 servings

Equipment

  • 1 cookie sheet
  • 1 cutting board
  • 1 knife
  • 1 set of measuring spoons
  • 1 measuring cup
  • 1 silicon tipped or wooden spoon
  • 1 non stick 4 qt pot
  • 1 mixing bowl
  • 1 piece parchment paper cut in half
  • 1 towel

Ingredients
  

  • 1 large or 2 small sweet potatoes
  • 1 medium sized eggplant
  • 2 cups quinoa
  • 1 large onion
  • 1 tsp minced garlic
  • 1 tsp garlic powder
  • fine granulated salt
  • rock salt
  • 1 tsp fine granulated black pepper
  • olive oil

Instructions
 

  • Wash the eggplant and slice it not too thick and not too thin, place on a half sheet of parchment paper on top of a towel
  • Sprinkle rock salt on both sides of the eggplant
  • Let eggplant sit for 30 minutes
  • Preheat the oven to 375℉ or 190℃
  • Wash the sweet potato and place it on a half sheet of parchment paper on the cookie tray, and put it in the oven
  • After 30 minutes, rinse the eggplant and cut into ¼ or ⅛, depending on the size of the slices
  • Mix the eggplant, olive oil, and lightly sprinkle with salt
  • Remove the tray from the oven with the sweet potato and place the eggplant pieces on it
  • Cook eggplant and sweet potato for another 30-40 minutes until both are done cooking
  • Dice onions into small pieces
  • Cover bottom of the pot with olive oil
  • Add diced onions to the pot and sprinkle with salt and pepper to taste
  • Add minced garlic about half way through the cook
  • Once onions are cooked place in mixing bowl
  • In the same pot that you sautéed the onions, add 3.5 cups of water to the pot and bring to a boil with 1 teaspoon of salt and 1 teaspoon of garlic powder
  • Add the 2 cups of quinoa to the pot and cook per the bag's instructions
  • When the sweet potato is done, cut off the skin and dice and cube it
  • Once the quinoa is done, add the onions and garlic mixture, sweet potato, and eggplant, and mix in the pot.
  • Serve warm, cold or room temperature

Kosher Gluten Free Recipes – Desserts

image of banana bread a gluten free dessert

Gluten Free Banana Bread

This is an easy recipe that we follow. It was adapted from several other recipes. When we make it we double it because it is that good.
Just one of my family-friendly Kosher Gluten Free Recipes.
Prep Time 40 minutes
Cook Time 55 minutes

Equipment

  • 1 bread baking pan 8 1/2" x 4 1/2"
  • 1 mixing bowl
  • 1 set of measuring spoons
  • 1 mixing fork
  • 1 spatula
  • 1 nutriBullet blender I use this to make the batter extra smooth
  • 1 measuring cup
  • 1 glass to break the eggs

Ingredients
  

  • 3 ripe bananas the riper the better
  • 2 large eggs
  • 1.5 cups cups gluten free four I like Bob Red's Mill 1 to 1 Baking Flour
  • ¾ cup sugar I use coconut sugar since my wife tries to stay away from regular sugar
  • cup coconut oil
  • 1 tsp baking soda
  • 1 tsp teaspoon vanilla extract
  • ¼ tsp corn starch
  • 1 pinch salt
  • 1 cup Chocolate chips optional
  • oil or non-stick cooking spray to oil pan

Instructions
 

  • Preheat over to 350 Fahrenheit or 177 Celsius
  • oil pan with oil or no stick cooking spray of choice
  • melt coconut oil (I use the defrost cycle on the microwave)
  • mix dry ingredients
  • mix wet ingredients
  • combine ingredients
  • add bananas, mush bananas and then mix batter
  • add all ingredients into a nutriBullet to create a creamy batter
  • pour batter into baking pan
  • bane for 1 hour
  • if you added chocolate chips will take an extra 5-10 minutes depending on how many chocolate chips you added

Notes

Here are links to products that we are an Amazon Affiliate partner for.  Please click the link to help support the site. 
Bob Red's Mill 1 to 1 Baking Flour
nutriBullet 
Gluten Free Apple Crumble

Gluten Free Apple Crumble

A family favorite for Rosh Hashanah. This recipe was made by combining several recipes.
Please note: Oats are naturally gluten free, which means you can enjoy them as part of a healthy gluten-free lifestyle. The key is to look for oats labeled gluten free, since regular oats are often processed in facilities with wheat or barley, creating a risk of cross-contamination. Choosing certified gluten-free oats gives you peace of mind that they’re safe to eat.
Just one of my family-friendly Kosher Gluten Free Recipes.
Prep Time 45 minutes
Cook Time 45 minutes
Servings 10 servings

Equipment

  • 1 knife
  • 1 cutting board
  • 1 measuring cup
  • 1 set of measuring spoons
  • 1 baking dish either a 9"x13" rectangle or 11" circle

Ingredients
  

  • 9 granny smith apples
  • 2 tbsp lemon juice
  • cup brown sugar We use maple sugar because my wife does not eat white sugar
  • 1 tsp cinnamon
  • 1 tsp nutmeg
  • 1 tsp pumpkin spice
  • ½ cup coconut oil
  • 1 cup flour
  • 1 cup rolled oats
  • oil or non stick cooking spray

Instructions
 

  • peel apples and cut into small pieces and place into mixing bowl
  • pour lemon juice over apples as peel and cut apples
  • add nutmeg, pumpkin spice, cinnamon and ½ cup of sugar to the apples
  • mix apples and spices pour into the oiled baking dish
  • in a mixing bowl add 1 cup of sugar, flour, rolled oats and coconut oil and mix together
  • spread the topping mixture on top of the apple mixture
  • bake for 45 minutes
Rice Crispy Treats

Dandies Gluten Free Crisp Rice Treats one of my Kosher Gluten Free Recipes

Rice crispy treats have always been a favorite treat of mine. Another favorite treat are marshmallows. A few weeks ago I was eating marshmallow and I looked at the back of the bag and it had a link for a recipe https://dandies.com/recipes/crispies. I of course had to try it.
If you live in Israel Dandies are available at ניצת הדובדבן Nitzat Haduvdevan. Otherwise you can order them on Amazon. I left a link for you at the bottom.
Their website offers stove top and microwave instructions.
I only have tried the stove top, which is the recipe I am going to share.
This has become one of my families favorite Gluten Free Recipes.
Prep Time 5 minutes
Cook Time 7 minutes

Equipment

  • 1 Pot
  • 1 spatula
  • 1 measuring cup
  • 1 set of measuring spoons
  • 1 8x8 cake pan
  • 1 sheet parchment paper

Ingredients
  

  • 1 (10 ounce) package of Dandies® Mini Marshmallows or Dandies® Marshmallows
  • 4 tbsp vegan butter of choice (you may replace 1-2 T with coconut oil for flavor) I only use coconut oil
  • 1 tbsp water
  • 4.5 cups Crisp Rice Cereal

Instructions
 

  • In a large pot melt vegan butter or coconut oil over medium to low heat
  • Add Dandies® Marshmallows
  • Stirring constantly
  • After 3 minutes add 1 Tbsp water and continue stirring until melted together.
  • Remove from heat
  • Add crisp rice cereal to melted marshmallow mixture and mix to fully coat the cereal.
  • Press mixture into a 8x8 pan -- I find parchment paper helps
  • Let cook and enjoy
Gluten Free Peanut Butter Cookies

Gluten Free Peanut Butter Cookies one of my Kosher Gluten Free Recipes

A family friend brought us back a bag of Hershey Kisses from the United States. . My daughter saw that on the bag there were recipes on Hershey's website. We tried the recipe and we really liked the cookies. I personally I think that they tasted better without a Hershey Kiss, so thank you to Hershey for a great gluten free peanut butter cookie recipe.
Hershey's recommends using Reese's Peanut Butter but I used Skippy.
Prep Time 15 minutes
Cook Time 10 minutes
Servings 36 cookies

Equipment

  • set of measuring spoons
  • measuring cup
  • 2 cookie sheet
  • 1 parchment paper

Ingredients
  

  • 1 cup creamy peanut
  • cup granulated sugar
  • cup packed light brown sugar
  • ½ tsp vanilla extract
  • ½ tsp baking soda
  • ¼ tsp salt
  • cup granulated sugar for rolling extra sugar for rolling

Instructions
 

  • Heat oven to 350°F. Remove wrappers from chocolates
  • Beat peanut butter, granulated sugar, brown sugar, vanilla, baking soda and salt in large mixing bowl. Add egg; beat well
  • Shape dough into 36 equal balls (about 1 inch). Roll in granulated sugar; place on ungreased cookie sheet
  • Bake 8 to 10 minutes or until lightly browned. Remove from cookie sheet to wire rack. Cool completely.
  • If you want to add the Hershey Kiss
    Immediately press a Kiss into center of each cookie; cookie will crack around edges.

Notes

Please help support the site by using my Amazon affiliate links. 
REESE'S Peanut Butter
https://amzn.to/4a6B5DC
SKIPPY Creamy Peanut Butter
https://amzn.to/4a2PMHT
cake in a mug

Gluten Free Cake in a Mug

My daughter is a madricaha or counselor for Bnai Akiva. For those unfamiliar with it, Bnai Akiva is a global Jewish religious Zionist youth movement.
Last week, in the wake of the war with Iran, they chose to do their weekly activity via Zoom. She and her fellow madrichim or counselors used our kitchen to Zoom, "The easiest chocolate cake in the world, in a mug"   a recipe that was found on https://www.mako.co.il/food-recipes/recipes_column-cakes/chocolate_cakes/Recipe-7ade612a571e621004.htm?Partner=searchResults
The recipe is in Hebrew, so I translated it. Is this recipe the greatest cake in the world? Not really, but it's good and, more importantly, a fun activity for kids.
Though the original recipe was not gluten-free, my daughter subbed gluten-free flour to make her chocolate cake in a mug.
Thank you to my daughter, who made another "cake in a mug" for this week's post.
Prep Time 15 minutes
Cook Time 2 minutes
Servings 1 mug

Equipment

  • 1 mug
  • 1 set of measuring spoons
  • 1 mixing bowl
  • 1 spoon

Ingredients
  

  • 4 tbsp gluten free flour
  • 4 tbsp sugar
  • 2 tbsp cocoa powder
  • 1 egg
  • 3 tbsp milk
  • 3 tbsp oil
  • 2 tbsp dark chocolate chips
  • ½ tsp vanilla extract
  • pinch baking powder

Instructions
 

  • In a small bowl, mix the dry ingredients
  • Add the egg and stir lightly
  • Add the oil and milk and continue mixing until you get a smooth batter
  • Add the chocolate chips and vanilla extract and stir gently
  • Pour the batter into mug (fill mug up to 2/3 full).
  • Microwave for 50 seconds to 1 minute
  • Eat warm, make it a special treat and serve with chocolate syrup, whipped cream or vanilla ice cream
muddy buddies

Gluten Free Pareve Muddy Buddies

This recipe is a delicious gluten-free twist on the classic muddy buddies snack. Made with crisp rice or corn cereal, coated in melted dairy-free chocolate and coconut oil, then tossed in powdered sugar, it’s the perfect balance of sweet, crunchy, and addictive.
Even with simple substitutions (like dairy-free chocolate chips or coconut oil), the result is a treat that works beautifully for Shabbos, holidays, or anytime you want a quick, crowd-pleasing snack.
Full disclosure: I added a little extra powdered sugar for the photo so they’d look more like the recipe pictures online.
Prep Time 15 minutes
Servings 18 servings

Equipment

  • measuring cup
  • set of measuring spoons
  • Microwave safe bowl
  • 2-gallon resealable food-storage plastic bag. or Tupperware container
  • spoon

Ingredients
  

  • 9 cups Rice Chex, Corn Chex or a off label brand
  • 1 cup semisweet chocolate chips ( we used pareve chips)
  • ½ cup peanut butter
  • ¼ cup coconut oil it is healthier or you can use margarine
  • 1 tsp vanilla
  • cups powdered sugar (plus a little extra to sprinkle on before you serve.

Instructions
 

  • Into large bowl, measure cereal; set aside.
  • In 1-quart microwavable bowl, microwave chocolate chips, peanut butter and butter uncovered on High 1 minute; stir. Microwave about 30 seconds longer or until mixture can be stirred smooth. Stir in vanilla. Pour mixture over cereal, stirring until evenly coated. Pour into 2-gallon resealable food-storage plastic bag, or Tupperware container.
  • Add powdered sugar. Seal bag; shake until well coated. Spread on waxed paper to cool. Store in airtight container in refrigerator.
  • Sprinkle extra powdered sugar before serving.
chocolate depression cake

Gluten Free Chocolate Depression Cake

This simple yet rich chocolate cake is inspired by two sources — a classic Reddit “Depression Cake” recipe and Milk Street’s Coffee-Infused Version. The result is a moist, deeply flavorful cake that’s quick to make and surprisingly indulgent despite its humble ingredients.
We tested both versions and found that swapping the water for coffee (as Milk Street suggests) really enhances the chocolate flavor. Using Bob’s Red Mill 1-to-1 Gluten-Free Baking Flour worked perfectly — you’d never know it’s gluten free.
The cake stands beautifully on its own without frosting, but you can add a light chocolate glaze if you like. Either way, it’s an easy, crowd-pleasing dessert that happens to be gluten-free, dairy-free, and vegan.
Recipe inspired by community contributions on Reddit and Milk Street.
Prep Time 20 minutes
Cook Time 55 minutes
Servings 12 servings

Equipment

  • 1 set of measuring spoons
  • 1 measuring cup
  • 1 mixing bowl
  • 1 whisk
  • 1 spatula
  • 1 8 inch x 8 inch baking dish
  • 1 toothpick or cake tester

Ingredients
  

Instructions
 

  • Preheat over to 350°℉/ 177℃
  • Whisk together the flour, cocoa, brown sugar, baking soda and salt, breaking up any lumps of cocoa and sugar
  • Then mix in the wet ingredients
  • Pour the batter into the baking dish and bake for about 55 minutes. Check that the cake is fully cooked—if needed, continue baking until a toothpick or cake tester inserted in the center comes out clean and dry.
  • Take the cake out of the over and let cool
  • While the cake is cooling make the frosting
  • Allow the cake to cool completely before frosting. If you’re impatient like us, place it in the fridge for a few minutes to help it along to shorten cooling time, once it’s no longer hot. Then frost and enjoy.
gluten free chocolate crinkle cookies

Gluten Free Chocolate Crinkle Cookies

This is an easy gluten free cookie recipe. Please do not make the same mistake I did and read the whole recipe first. I was rushing and thought I had this recipe under control… until I pulled the cookies out of the oven and realized I’d completely skipped the part about rolling the dough in powdered sugar. Everything had already baked — OOPS — so I improvised and dusted them after the fact. Surprisingly? Still delicious.
Prep Time 2 hours 30 minutes
Cook Time 17 minutes
Servings 48 cookies

Equipment

  • 2 mixing bowls
  • 1 set of measuring spoons
  • 1 measuring cup
  • 1 whisk
  • 2 cookie sheets
  • 1 spatula
  • parchment paper
  • 2 cups to crack and check eggs
  • 1 wire rack

Ingredients
  

  • 2 1/3 cups gluten free flour Bob's Red Mill Gluten Free 1 to 1 Baking Flour available on iHerb and Amazon my affiliate link is listed below
  • 2 tsp baking powder
  • ½ tsp salt
  • 2 cups sugar
  • ¾ cup vegetable oil
  • ¾ cup unsweetened cocoa powder
  • 4 eggs
  • 2 tsp vanilla extract
  • ¼ cup powdered sugar

Instructions
 

  • In a small bowl, combine flour, baking soda & salt.
  • In a larger bowl combine sugar & oil. Mix in cocoa, then beat in eggs & vanilla. Add flour mixture & blend well.
  • Cover bowl or wrap dough in wax paper & refrigerate 2 hours to firm up.
  • Pour powdered sugar in a small bowl
  • Shape the dough into 1” balls, roll in the powdered sugar, then place 2” apart on greased cookie sheets.
  • Bake at 350° for 15–17 minutes, or until cooked through
  • Let stand 5 minutes, remove to a wire rack & let cool completely.
Gluten Free blonde brownies

Gluten Free Blonde Brownies

One of my favorite desserts that my mother-in-law makes is her blond brownies. The original recipe comes from the Amit Women Galila Chapter cookbook, Plain and Fancy.
A few weeks ago, my daughter suggested we try making them gluten-free. The result was a huge hit—though we did learn one important lesson: even chocolate has its limits. We ended up adjusting the amount of chocolate chips, because believe it or not, there can be too much chocolate in a recipe.
Below you will find the original recipe adjusted to be gluten free and doubled.
Prep Time 25 minutes
Cook Time 45 minutes
Servings 12 servings

Equipment

  • 1 set of measuring spoons
  • 1 measuring cup
  • 2 mixing bowls
  • 2 glass cups for breaking and checking eggs
  • 1 large fork or Foley fork
  • 1 spatula
  • 1 whisk
  • 1 9" x 13" baking pan

Ingredients
  

  • 2 cups gluten free flour (sifted) we prefer Bob's Red Mill, 1 To 1 Baking Flour
  • 1 tsp baking powder
  • ¼ tsp baking soda
  • 1 tsp salt
  • 2 eggs (lightly beaten)
  • 2 tsp vanilla
  • 1 cup chopped walnuts
  • 2/3 cup recipe called for butter or shortening we used coconut oil
  • 2 cups brown sugar (firmly packed) we tried maple sugar a little healthier and just as good
  • ½ cup chocolate chips about half a cup so it covers the top but not too much

Instructions
 

  • Sift flour
  • Add baking powder, baking soda and salt
  • Sift dry mixture
  • Melt coconut oil
  • Cream sugar and shortening which means -- beat softened shortening and sugar together until the mixture is light, fluffy
  • Add eggs and vanilla to the sugar and coconut oil
  • In a larger separate mixing bowl slowly add dry mixture to the mixed liquids
  • Grease 9" x 13" pan
  • Preheat oven to 350℉ / 177 C
  • Spread the brownie mix into the grease pan
  • Generously but not too generously sprinkle chocolate chips on top of the batter
  • Bake for about 45 minutes or until cooked through
  • After taking pan out of the over pre cut bars when they are still a little warm

Notes

Here is an affiliate link to Bob's Red Mill, 1 To 1 Baking Flour if you click it helps keep the project going. 

Gluten Free Restaurants

Restaurants with gluten free options

Gluten Free Bakeries

Recommendations for gluten bakeries

Gluten Free Recipe Ideas

Gluten free recipes from our kitchen